GitLab Workflow Integration
The Veracode GitLab Workflow Integration allows you to set up an automated security scanning program for all of your GitLab repositories in the Premium and Ultimate groups.
It automates policy scans and pipeline scans for Static Analysis, and agent-based scans for SCA.
In addition, it includes the configuration file, veracode.yml, which stores the default settings for the scans.
This document explains the steps required to perform the integration, configure Veracode scans, and view scan results.
Language support
The GitLab Workflow Integration supports scanning repositories written in the following languages:
| Language | Version | Package manager | Static support | SCA support |
|---|---|---|---|---|
| .NET | .NET 6, 7, 8 | Not applicable | Yes | Yes |
| Java | Java 21 or later | Gradle 8.7 | Yes | Yes |
| JavaScript and TypeScript | Not applicable | NPM, Yarn | Yes | Yes |
| Python | Python 3 | pip | Yes | Yes |
For Static Analysis, the GitLab Workflow Integration automatically compiles the repository by default. However, for some applications, you may need to provide specific compilation instructions in the original repository. See the packaging requirements for each language.
For SCA, see the agent-based scan support matrix for additional support details.
Prerequisites
- To set up the integration, you must have the Administrator or Security Lead role in the Veracode Platform.
- On GitLab, create a personal access token from a service account that has access to all the groups targeted for scan.
Ensure that you select the scope
apiwhen creating the personal access token. After you create the personal access token, save it to a secure location.
Configure the integration
You can configure GitLab Workflow Integration in two steps:
Install GitLab Workflow Integration
You install the GitLab Workflow Integration from the Veracode Platform.
To complete this task:
- Log in to the Veracode Platform.
- Select Repository Scan from the left menu.
- If you have other integrations, select ADD SCM INTEGRATION on the top-right of the page.
- Select GitLab, and then select NEXT.
- In GITLAB URL, provide the base URL for your GitLab cloud account. For example,
gitlab.com. Then, select NEXT. - In PERSONAL ACCESS TOKEN, enter the personal access token that you created in the prerequisites. Then, select INSTALL.
This installation creates a veracode project in GitLab and adds webhooks to all the Premium and Ultimate groups available under your GitLab workspace.
Configure Veracode API ID, secret key and agent token
For static scan, you should configure Veracode API ID and secret key. For SCA scan, you should configure Veracode token.
To complete this task:
- Generate your Veracode API ID and secret key from the Veracode Platform.
- Identify the agent token value for the SCA workspace in which you want your scan results to appear. If you do not know the token, regenerate it.
- In GitLab, select Settings and then select CI/CD.
- In the CI/CD Settings page, expand Variables and then select Add variable.
- In Key, enter VERACODE_API_ID. In Value, enter the value for the Veracode API ID. Then, select Add Variable. Similarly, add the key and value for the following variables:
| Key | Value |
|---|---|
| VERACODE_API_KEY | secret key |
| VERACODE_AGENT_TOKEN | agent token |
| VERACODE_SRCCLR_URL | agent token |
The value for VERACODE_SRCCLR_URL is based on the region. For US Commercial, the URL is https://sca-downloads.veracode.com or https://sca-api.veracode.com.
Currently, GitLab Workflow Integration is only available for the US Commercial region.
Configure scans
In the veracode.yml file, you can customize the behavior of the GitLab Workflow Integration. You can apply several configurations, including:
- The types of scans to run
- The branches targeted
- The Veracode security policy to apply
- Whether the scan should be triggered by a push or a pull
By default, the veracode.yml file is configured with the following scan triggers on branches of a project that is a part of a Premium or Ultimate group:
- Static pipeline scan on any push activity on any branch
- SCA agent-based scan on any push activity on any branch
If you set analysis_on_platform to true, merging any code into your analysis_branch triggers policy scans, which send results to the Veracode Platform.
You can configure all of these to fit your own organization's process by editing the veracode.yml file.
Specify repositories to scan
You can include and exclude specific repositories from scans.
Exclude specific repositories
You can exclude specific repositories from the scan.
To complete this task:
- Open
repo_list.ymlin theveracodeproject. - Under
exclude_repos:, enter the list of repositories you want to exclude.
Each repository name must be surrounded by single quotes along with the complete path, for example: 'java/java_Repo'.
If you want to exclude a complete group from being scanned, add the group name followed by '*', for example: 'java/*'.
Include specific repositories
- Open
repo_list.ymlin theveracodeproject. - Under
include_repos:, enter the list of repositories you want to include.
Each repository name must be surrounded by single quotes along with the complete path, for example: 'java/java_Repo'.
If you want to exclude a complete group from being scanned, add the group name followed by '*', for example: 'java/*'.
If the list includes '*', delete it. If it is present, Veracode will scan all repositories that are not listed under exclude_repos.
The Veracode configuration file
In your veracode.yml file, you can configure the following values to customize the integration:
| Value | Description | Default value |
|---|---|---|
push:trigger | If true, a pipeline scan is triggered when you commit changes to a branch. | true |
push:branches_to_run | The branches that trigger pipeline scans when you commit changes. If '*', all branches can trigger scans. | '*' |
push:branches_to_exclude | The branches that do not trigger scans. Only applies if branches_to_run is set to '*'. | |
pull_request:trigger | If true, a scan is triggered when you perform a pull request action. | true |
pull_request:action | Pull request actions that trigger scans. Valid values are: opened, reopened, edited, synchronize, closed. | opened and synchronize |
pull_request:target_branch | The target branch that triggers scans when you perform pull request actions. | default_branch |
analysis_branch | The branch submitted to the Veracode Platform for analysis. If you do not enter a valid branch name, Veracode uses the default branch. | default_branch |
analysis_on_platform | If false, no scans are submitted to the Veracode Platform. If true, scans from the analysis_branch are submitted to the Platform, creating an application profile that has the repository's name. | false |
policy | The application security policy applied to your scan findings, if a policy is not already assigned to your application profile. | 'Veracode Recommended Medium + SCA' |
View scan results
You can view Veracode scan results in GitLab and from the Veracode Platform.
From GitLab
Static Scan results are available in the pipeline console log.
To complete this task:
- Open the veracode project.
- Select Build, and then select Pipelines.
- After the pipeline for a commit has passed, select
 , and then select pipeline.
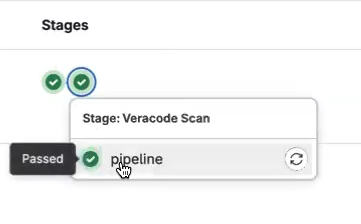
The results are displayed in the console log. The vulnerabilities, if any, are categorized based on the severity.
If vulnerabilities were detected during the scan, the following artifacts are generated in the directory named veracode-artifact:
- Scan results for the vulnerabilities in the project.
- One or more build files based on the number of languages scanned.
From Veracode Platform
If you set analysis_on_platform to true, you can view scan results in the Veracode Platform.
SCA scans return a summary report of your open source security findings as well as a detailed list of libraries, vulnerabilities, and licenses. For more information about SCA findings, see Viewing agent-based scan results.
Uninstall GitLab Workflow Integration
You may choose to uninstall the GitLab workflow integration under the following circumstances:
- The existing personal access token is unavailable.
- You want to delete the GitLab Workflow Integration.
- You want to reinstall the GitLab Workflow Integration.
If you plan to reinstall, save the existing configuration files veracode.yml and repo_list.yml locally. After you reinstall GitLab Workflow Integration, replace these files in GitLab with the ones you saved.
Manual uninstallation
To complete this task:
-
In GitLab, delete the
veracodeproject. -
For all the Premium and Ultimate groups:
- Open the group.
- Select Settings, and then select Webhooks.
- Delete the group hook that was created during installation.
Uninstall from the Veracode Platform
To complete this task:
- Log in to the Veracode Platform.
- Select Repository Scan from the left menu.
- Select GitLab, and then select NEXT.
- Select Uninstall.
- In GITLAB URL, provide the base URL for your GitLab cloud account. For example,
gitlab.com. Then, select NEXT. - In PERSONAL ACCESS TOKEN, enter the personal access token. Then, select UNINSTALL.